Task – Verilog Example
Write synthesizable and automatic tasks in Verilog
Tasks are sections of Verilog code that allow the Digital Designer to write more reusable, easier to read code. Tasks are very handy in testbench simulations because tasks can include timing delays. This is one of the main differences between tasks and functions, functions do not allow time delays.
Tasks should be utilized when the same operation is done over and over throughout Verilog code. Rather than rewriting code, one can just call the task. This reduces copy/paste errors in your code and allows quicker development time. It also makes the code much cleaner and easier to read. Yes, tasks can be synthesized!
Below is a list of rules for tasks:
- Tasks can have any number of inputs and outputs
- The order of inputs/outputs to a task dictates how it should be wired up when called
- Tasks can have time delay (posedge, # delay, etc)
- Tasks can call other tasks and functions
- Tasks can drive global variables external to the task
- Variables declared inside a task are local to that task
- Tasks can use non-blocking and blocking assignments
- Tasks can be automatic (see below for more detail)
Often tasks are created in the file they are used in. The example below demonstrates this. However tasks can also be included via the `include compile directive.
task_example.v:
///////////////////////////////////////////////////////////////////////////////
// File Downloaded from http://www.nandland.com
///////////////////////////////////////////////////////////////////////////////
module task_example ();

  reg [7:0] r_Mux_Addr_Data = 0;
  reg       r_Addr_Valid = 1'b0;
  reg       r_Data_Valid = 1'b0;

  task do_write;
    input [7:0] i_addr, i_data;
    begin
      // demonstrates driving external Global Reg
      r_Addr_Valid    = 1'b1;
      r_Mux_Addr_Data = i_addr;
      #10;
      r_Addr_Valid    = 1'b0;
      r_Data_Valid    = 1'b1;
      r_Mux_Addr_Data = i_data;
      #10;
      r_Data_Valid = 1'b0;
      #10;
    end
  endtask

  initial
    begin
      #10;
      do_write(8'h00, 8'hAB);
      do_write(8'h01, 8'hBC);
      do_write(8'h02, 8'hCD);
    end

endmodule
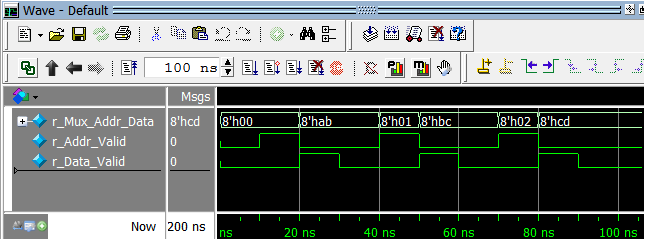
The Modelsim simulation screenshot below shows the result of the operation of the task.

Automatic Tasks
Tasks can be declared as automatic tasks as of Verilog 2001.
task automatic do_write;
Automatic is a term borrowed from C which allows the task to be re-entrant. A re-entrant task is one in which the items declared within the task are allocated upon every individual call of the task, as opposed to being shared between all calls of the task. This could be a problem in a simulation environment if code is forked and calls the same task at the same time. Race conditions can develop.
In C, all variables are automatic by default. In order to make them not automatic, they must be declared as static. Verilog is the opposite with tasks. All tasks are static by default and should be declared automatic if they are called simultaneously. A good practice is to declare your tasks as automatic by default. The example below displays the difference between a re-entrant task and a regular task. The non-automatic task is likely not behaving the way the user intended!
///////////////////////////////////////////////////////////////////////////////
// File Downloaded from http://www.nandland.com
///////////////////////////////////////////////////////////////////////////////
module task_auto ();

  task automatic auto_print;
    input [3:0] i_Value;
    begin
      #(i_Value) $display("Value = %d", i_Value);
    end
  endtask

  task non_auto_print;
    input [3:0] i_Value;
    begin
      #(i_Value) $display("Value = %d", i_Value);
    end
  endtask

  initial
    begin
      $display("Printing Automatic Tasks");
      fork
        auto_print(3);
        auto_print(6);
        auto_print(1);
      join
      #10;

      $display("Printing Non-Automatic Tasks");
      fork
        non_auto_print(3);
        non_auto_print(6);
        non_auto_print(1);
      join
    end
endmodule // task_auto
Console Result from Modelsim Simulation:
# Printing Automatic Tasks
# Value =  1
# Value =  3
# Value =  6
# Printing Non-Automatic Tasks
# Value =  1
# Value =  1
# Value =  1


Leave A Comment